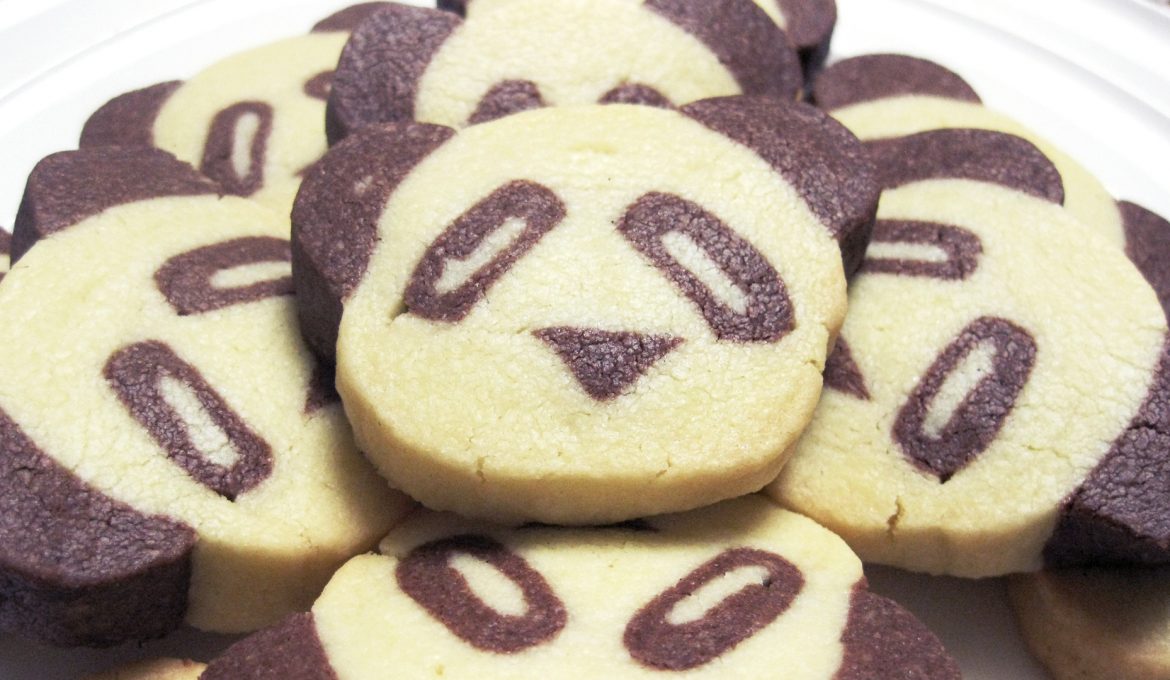
Here’s a nice project. If you are looking for a nice challenge and something crafty to do, try making panda shortbread.
We came to making these panda cookies after being given some shortbread cookies for Christmas which got us searching for a recipe to make some chocolate shortbread before that reminded us of those Panda Shortbread we used to be able to buy, but can’t now because they don’t sell them anymore anywhere. So, we decided to search a recipe out and make them ourselves!
Making Panda Shortbread can fill up over an hour, so it can be tedious work, especially if you want everything to be precise and neat; but, by the end of it, the reward is something cute and tasty to eat!
We will divide this tutorial into 3 sections:
Recipe for Making the Plain Dough and Cocoa Dough
Bake: 180C. Bake time: 10 – 15 mins. Makes 12.
Adapted from: Christine’s Recipes – Shortbread Cookies
Materials
- 120g unsalted butter
- 40g caster sugar
- 1/8 tsp vanilla extract
Plain Dough
- 100g flour
- 17g rice flour
- pinch salt
Cocoa Dough
- 44g flour
- 6g cocoa
- 8g rice flour
- pinch salt
Directions
- Sift the ingredients of the Plain Dough and Cocoa Dough into two separate medium bowls. Set aside.
- Cream unsalted butter and sugar until fluffy and light in colour. Then mix in vanilla extract.
- Weigh the creamed butter-sugar mixture (you may need another bowl to do this) and divide the mixture 2:1, so that 2/3 of the creamed butter-sugar mixture goes into the bowl containing the sifted dry ingredients for the plain dough and 1/3 for the bowl containing the dry ingredients for the cocoa dough. (From experience, the entire creamed butter-sugar mixture is ~150g, so ~100g goes into the plain dough bowl and ~50g goes into the cocoa dough.)
- Mix and form doughs.
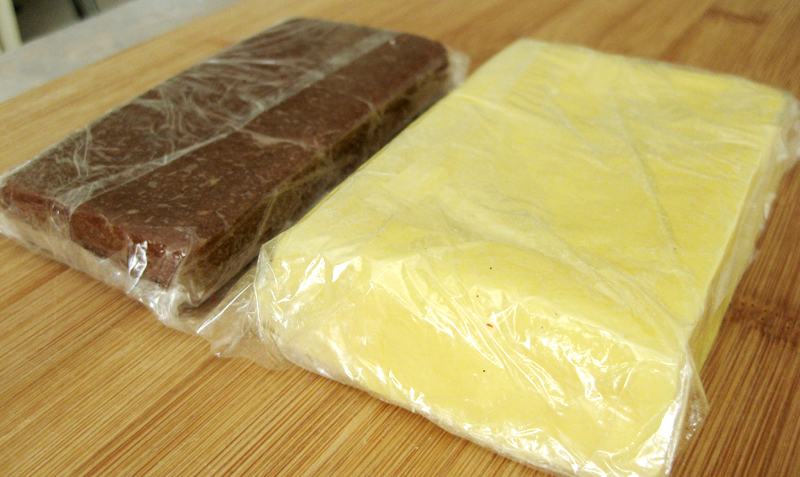
- Place each of the doughs in cling wrap. We find it convenient and efficient to have the doughs roughly rectangular and in the dimensions below:
Plain dough: L: 11 cm H: 2.4 cm; Cocoa dough: L: 11 cm H: 1.5 cm. - Put into the fridge for about 1 hour to harden up slightly. You could skip this step if you find that you are confident and comfortable with moulding the doughs into shapes without firming it up. Use your judgement if you require this step.
Making the Panda Log
Once the plain dough and cocoa dough are made, we can finally start making the Panda Log.
Equipment you will need:
- Cling wrap (x3 20cm-long sheets to keep dough from drying out and help shape the parts)
- Rolling pin
- Flat plastic bowl scraper (to shape and smoothen)
- Knife (to cut dough)
- 15 cm ruler (to measure)
Overview of the Parts of the Panda Log
In total, there are 4 parts of the panda face with a maximum of 3 sub-parts in them:
1. Eye Area
- Eye pupils
- Black eye furs
- Inner eye area
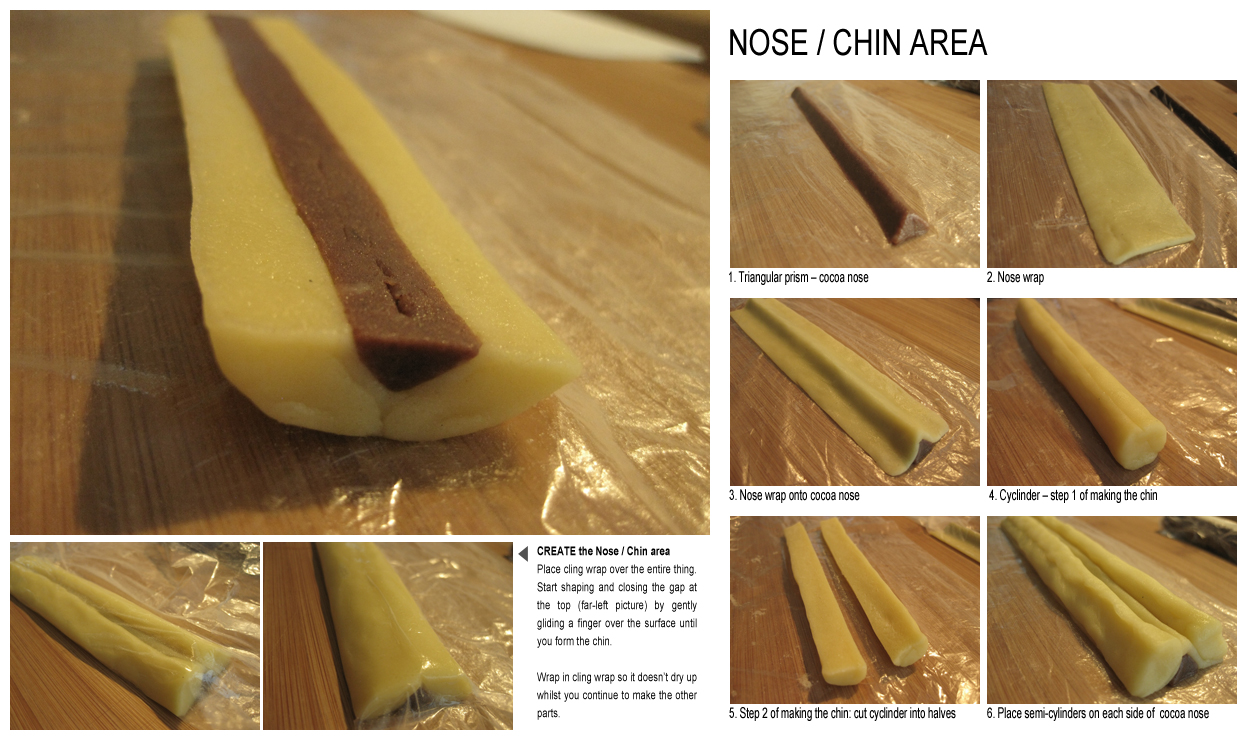
2. Nose/Chin Area
- Nose
- Nose wrap
- Chin
3. Forehead
4. Ears
It’s a very quick process once the Eye Area and Nose/Chin Area are done because the Forehead and Ears don’t have sub-parts to make.
The Process
The dough should always be cut parallel to the longest side (11 cm) of the dough. Rolling and shaping will make the final length of the panda log 14 cm. There should be no leftovers or shortage of dough when the panda log is complete. If you would like pointers on how to make the shapes, they are at the end of the post. We’ve included image cards showing the shapes of the panda face pieces and how to construct them into a panda face log.
Advice: When you are attaching pieces, make sure you are attaching them on firmly. Otherwise, they can fall off when you come to slice them into individual shortbread biscuits! It’s not a problem if they do, though: baking will ‘glue’ the pieces together!
LENGTH OF ALL PIECES: 14 cm
THE EYE AREA
Eye pupils – Cut 0.7 cm from Plain dough (there will be leftovers from this cut)
2 skinny cylinders: 0.7 cm diameter
Black eye fur– Cut 1.1 cm from Cocoa dough
2 flat rectangular pieces: 4 cm width
Inner eye area – Cut 0.9 cm from Plain dough
1 isosceles triangular prism: 2.2 cm base width (height is the height of the eyes)
Optional (but recommended): use the leftover Plain dough from the cut you did for the Eye pupils to level out the top. It will make easier attachment of the Forehead.

NOSE/CHIN AREA
Nose – Cut 0.3 cm from Cocoa dough
1 triangular prism: 1 cm base width, 0.9 cm height
Nose wrap – Cut 0.5 cm from Plain dough
1 rectangular flat piece: 3.5 cm width (plus a few millimetres of tapering)
Chin – Cut 1.7 cm Plain dough
1 cylinder: 1.5 cm diameter. Cut in half into two semi-cylinders, one for each side of the nose.
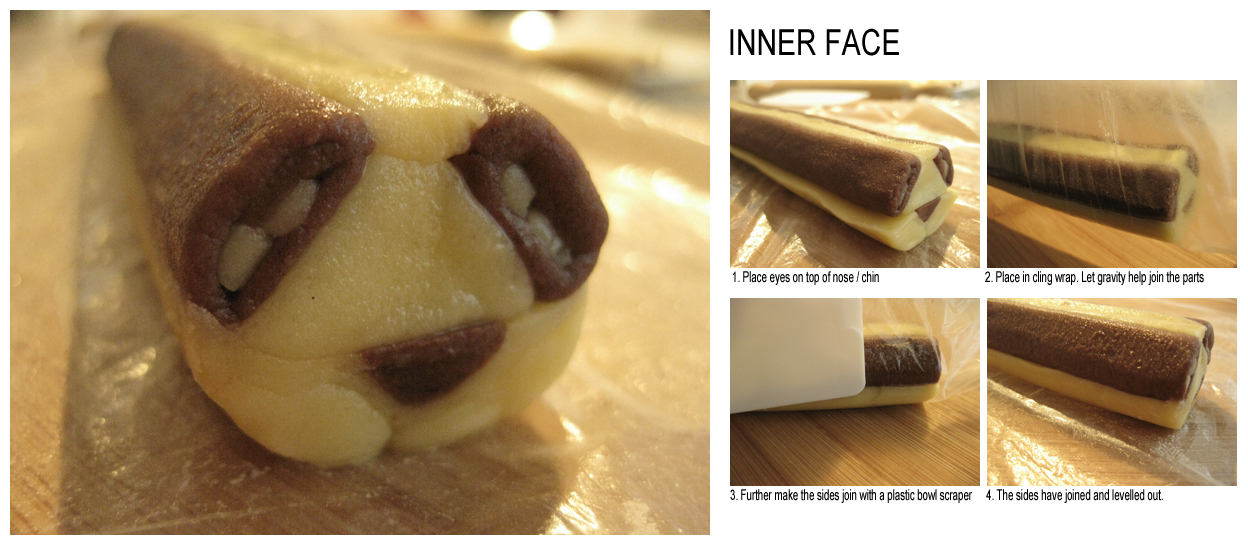
CONSTRUCTION OF INNER FACE
Simply place the Eye Area part on top of the Nose/Chin Area part.
Optional: we did choose to give a little more height for the chin before making the Forehead (not shown in the image) because we didn’t like how close the nose was to the bottom. If you like to, here are the measurements:
Addition to Chin – cut 0.7 cm from Plain dough
1 rectangular flat piece: 5 cm width or ½ the circumference of the Inner Face.
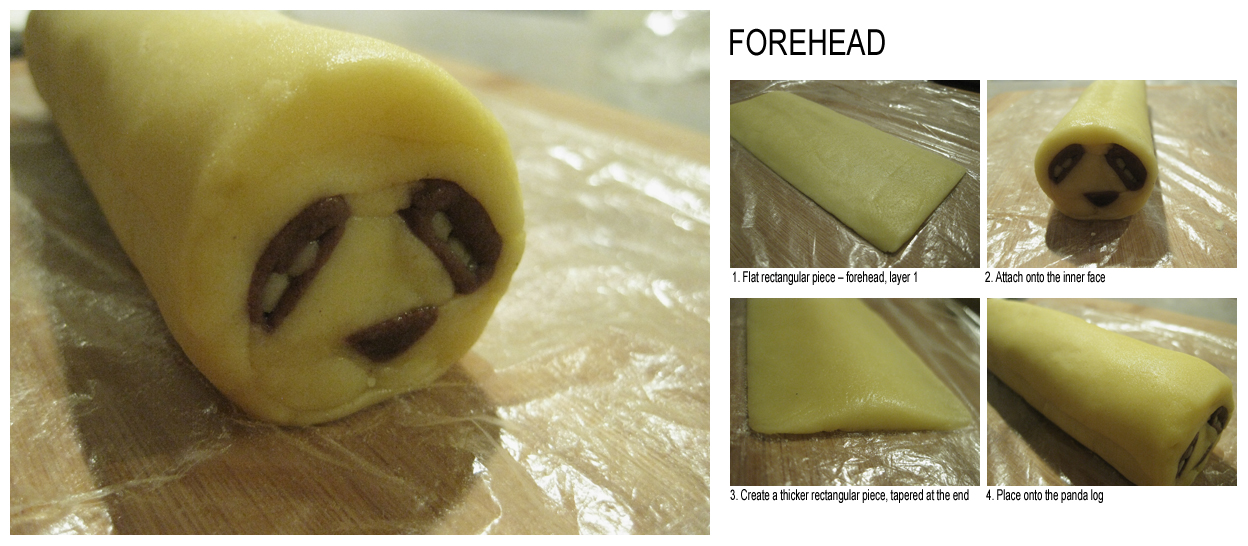
FOREHEAD
Forehead Layer 1 – Cut 2 cm from Plain Dough
1 rectangular flat piece: 5 cm width (plus a few millimetres of tapering)
Forehead Layer 2 – remainder of the Plain Dough
1 rectangular flat piece: 3 cm width (plus tapering as shown in the image labelled, ‘3’)
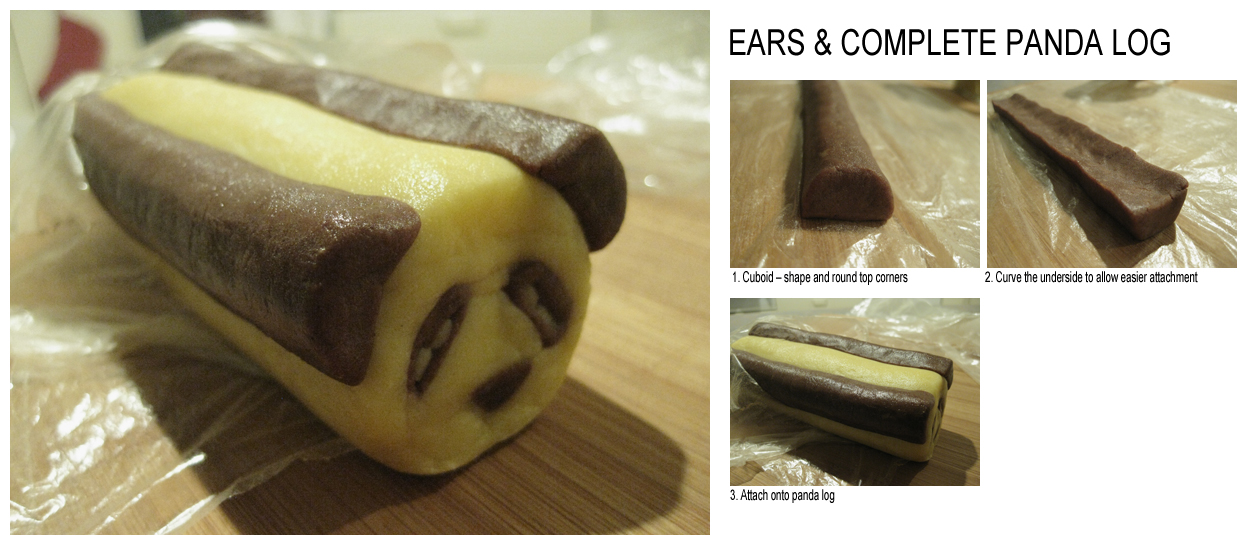
EARS & COMPLETE PANDA LOG
Ears – remainder of the Cocoa dough
1 cylinder. Cut in half into two semi-cylinders, making two ears.
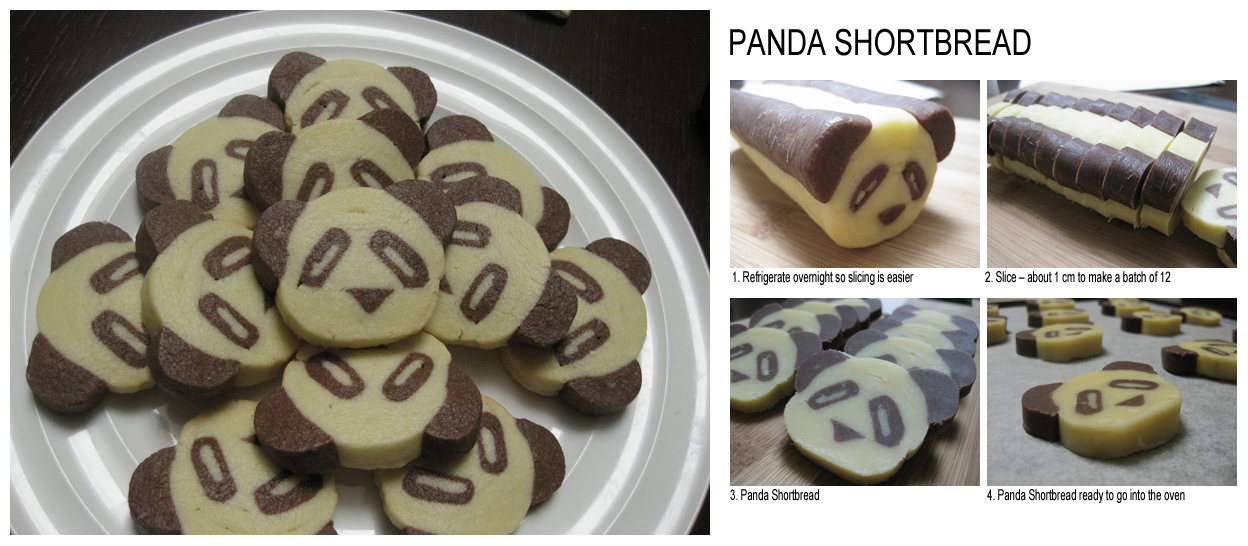
Making the Panda Shortbread
Once you have finished the panda log, you need to harden it, so it’s easier to slice into individual shortbread cookies. Refrigerate overnight or at least 3 – 4 hours and it should be hard enough to slice through.
Slice approximately 1 cm to make 12 biscuits. Place them on a cookie sheet and bake them at 180C (or 160C if you have a convection oven) for 10 – 15 minutes. And voilà, panda shortbread!
CREATING THE SHAPES
There are really only 3 shapes used to create the panda shortbreads: cylinder, flat rectangular piece and triangular prism which can be used to create other shapes.
Cylinder – place your cut of dough onto a piece of cling wrap. Fold the cling wrap over the dough and begin rolling it out with your hands to the correct length (14 cm). To make the cylinder neat and uniform, (if not already) have the dough neatly up against the cling wrap’s folded edge (the edge that is folding over the dough) and use a bowl scraper to press the dough up against the folded edge until uniform. A sharp edge will be created: use the bowl scraper to lightly roll it—in short rolls (else, for skinnier cylinders, the pieces will twist and break)—until the sharp edge becomes rounded and the piece is a cylindrical again.
Flat Rectangular Piece – place your cut of dough onto a piece of cling wrap. Crudely flatten it to decrease the height so to make it easier to wrap the dough in the cling wrap. Wrap the dough in the cling wrap very tightly in the dimensions you want e.g. 3.5cm x 14cm. Get your rolling pin and roll and flatten the dough lengthways, widthways and at the corners so it fills the spaces until you form the rectangular wrap.
Triangular Prism – place your cut of dough onto a piece of cling wrap. Pinch the top to form a triangular prism, all the while, slowly getting it out to the correct length (14 cm). To make the triangular prism neat and uniform, wrap the dough in the cling wrap very tightly, fold the left and right ends of the cling wrap underneath and have the dough sit on the ends (so to stop the dough from spreading beyond 14 cm) and use the bowl scraper to press the dough on one face of the triangular prism. This will make the triangular prism skewed to one side. Simply press the opposite face until it’s even again.
ADVERTISEMENT