In our post “Installing Existing WordPress for Local Environment“, we wrote about installing XAMPP’s web server package. With this installed, we can now set up the blog we have online onto our computer. (If you haven’t got XAMPP installed, visit our first post in this series “Installing Existing WordPress for Local Environment” which guides you through getting the software installed.) The steps to setting up an existing WordPress blog on your computer is similar as setting it up on your web host. The only differences are the extra steps of downloading a copy of the WordPress database and the folder containing your website’s blog. The following are all the steps that need to be done to get an existing WordPress blog up and running on your computer:
- Download a copy of the WordPress database
- Download/Install your WordPress blog files
- Note MySQL settings from your blog’s wp_config.php file
- Create and import the downloaded WordPress database
- Create a user for the database
- Connect the created user to the database
- Redefine site address of your blog
There are quite a few steps there. When we start going into more detail, the post is going to be quite long. It’ll look like a lot of work to get an existing WordPress blog onto your own computer. It really isn’t the case. The post could probably cut down on some of the more commonsense steps, but we want to be as clear as possible to avoid being vague or too presuming for those who may want a more step-by-step guide. Okay, we better get on with it! : o) : o).
1. DOWNLOAD EXISTING WORDPRESS DATABASE
- Log in to your website’s control panel/cPanel
- Scroll down to the “Databases” section, click “phpMyAdmin”
- In phpMyAdmin, from the left sidebar, select the database of your WordPress blog
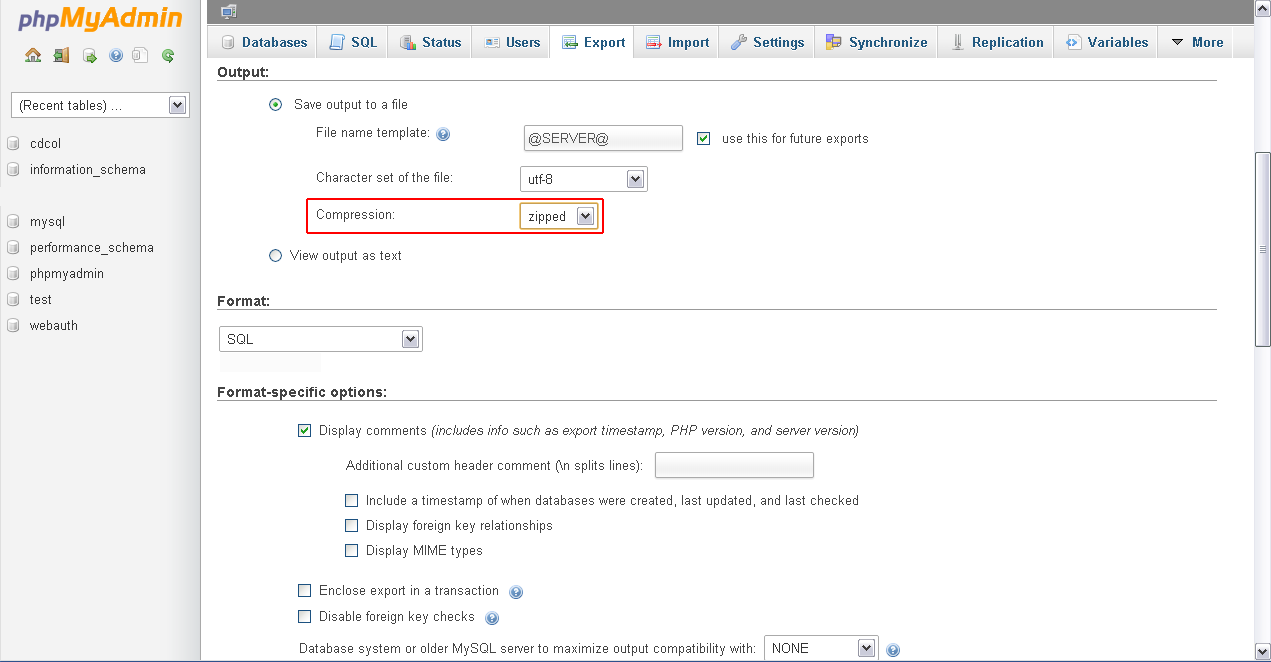
- Click the “Export” tab to enter the Export screen.
- Select “Custom” radio button to display more Export Method options
- Select compression of the database
- Leave all other sections as is. Click “Go” at the bottom of the page.
The main screen should load to display the tables of your WordPress blog.
Under the Output heading, select “Save output to a file” radio button. “zipped” should be selected as the compression; leave the file name template as “@SERVER@”; and character set of file should be “utf-8”.
2. DOWNLOAD/INSTALL WORDPRESS BLOG FILES
- Compress the blog folder
- Download the .zip file from your website’s cPanel to your computer’s hard drive
- Extract the contents of the .zip file
- Move the extracted blog folder to the XAMPP htdocs folder
On your website’s cPanel, go to your File Manager. Locate the folder containing your WordPress blog files. Right-click this blog folder and select “Compress”. Compressing the blog folder into a separate .zip file will allow you to download the entire folder in one go.
Alternatively, if you use a File Transfer Protocol (FTP) client, you can simply drag your blog’s folder onto your computer’s hard drive without needing to compress the folder. Skip the next two steps if you’ve used FTP to transfer the files.
If you don’t see the .zip file of your blog, you may need to refresh File Manager for it to appear.
After extracting the .zip file, you should have the entire blog folder on your computer. Move this folder to the XAMPP htdocs folder: the default path for Windows is “C:\XAMPP\htdocs”.
NOTE: You could always do a fresh install of WordPress. Doing this will mean having to go through the WordPress’ install process. To save doing this extra step and having to fill in WordPress’ wp_config.php file as well, we choose to download the blog folder rather than do a fresh install.
3. NOTE MySQL SETTINGS FROM YOUR BLOG’S WP_CONFIG.PHP FILE
Open the WordPress wp_config.php file with a text editor like Notepad. The wp_config.php file should be located at C:\XAMPP\htdocs\the_name_of_your_blog_folder\.
Below is the part of the wp_config.php file we want to take note of:
// ** MySQL settings ** //
define(‘DB_NAME’, ‘wordpress_dbname’);
define(‘DB_USER’, ‘test555);
define(‘DB_PASSWORD’, ‘db_password1’);
define(‘DB_HOST’, ‘localhost’);
define(‘DB_CHARSET’, ‘utf8’);
define(‘DB_COLLATE’, ”);
We will want to keep these details on hand as we will want the database we create to use the exact same details as above. So in summary, the details are as follows:
Database name: wordpress_dbname
Database user: test555
Database password: db_password1
Database host: localhost
Database character set: utf8
If you chose to do a fresh install of WordPress, skip this and move to importing your blog’s WordPress database.
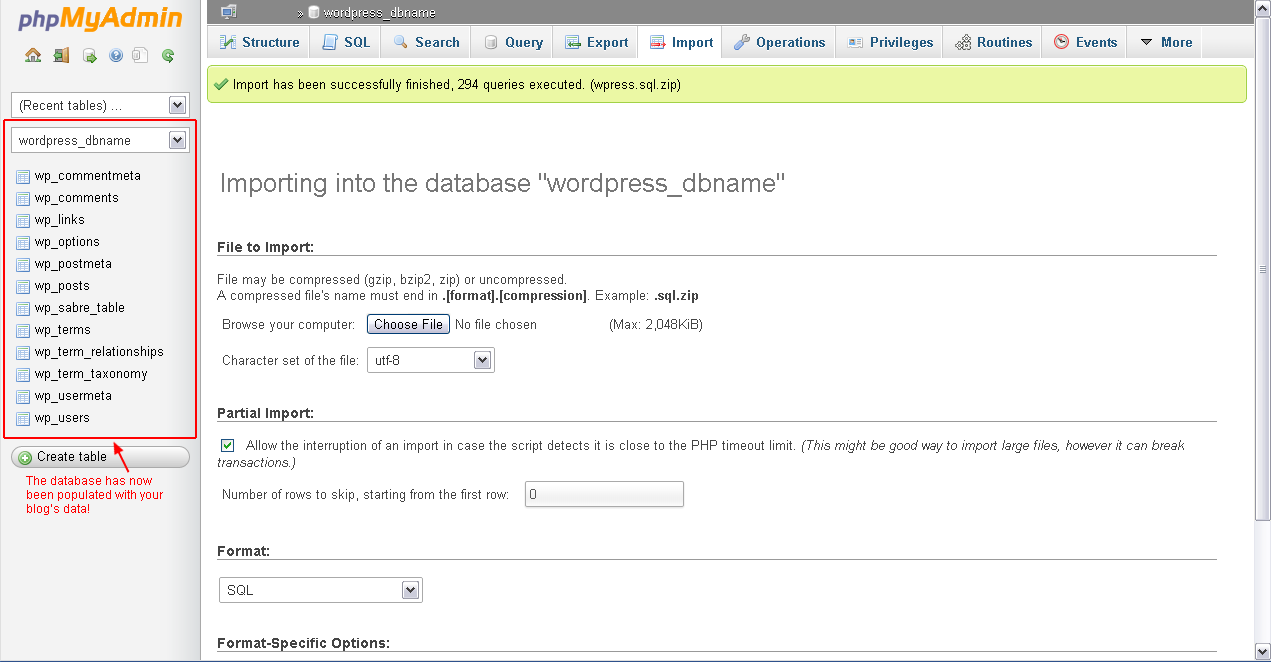
4. IMPORT THE WORDPRESS DATABASE
- Load phpMyAdmin in your Internet browser
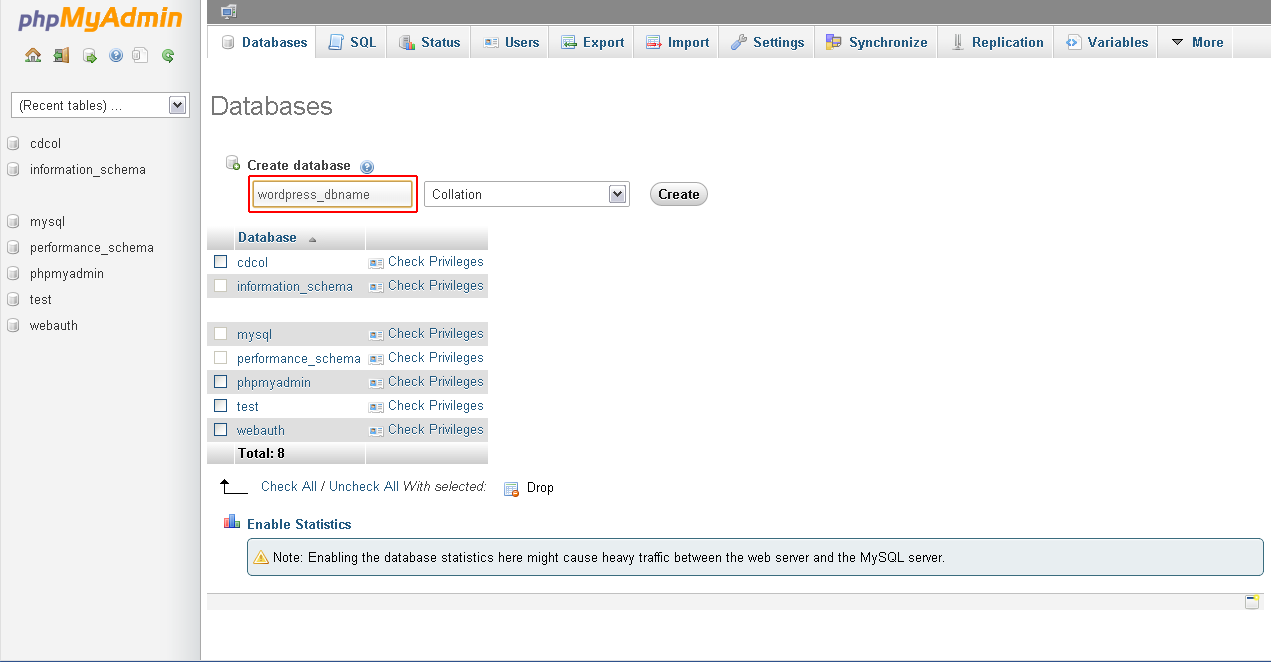
- Click the “Databases” tab and create a new database
- Select the newly created database
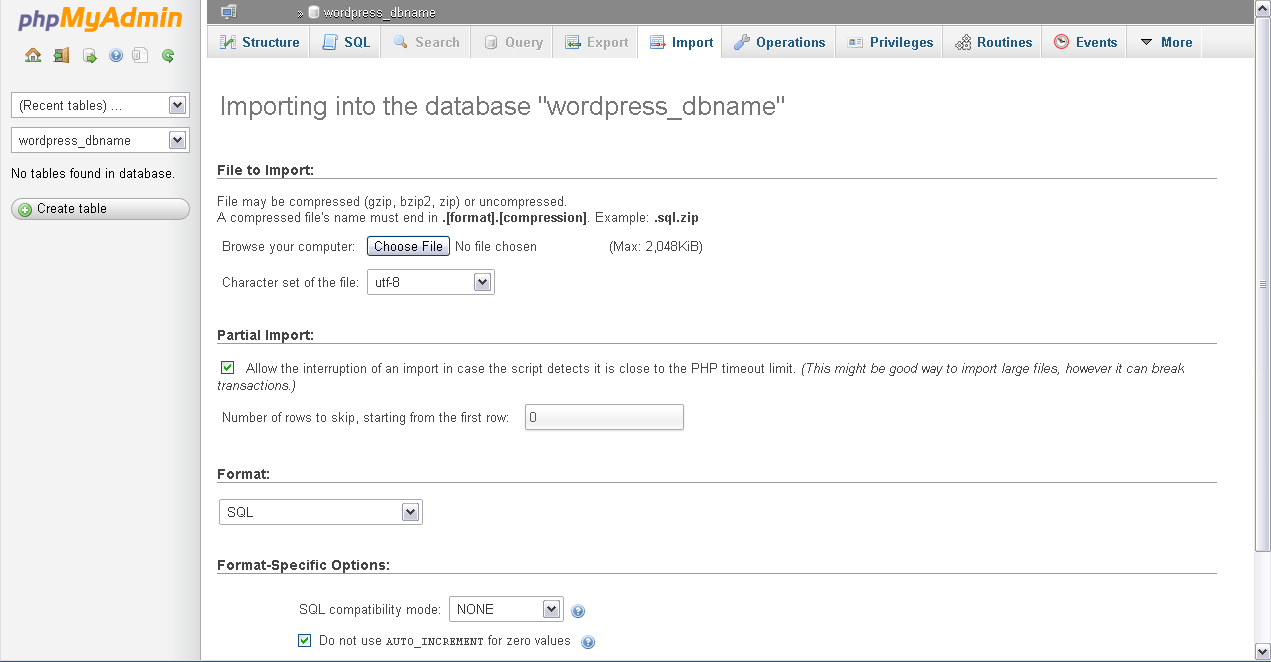
- Click the “Import” tab at the top of the screen
- Import the WordPress database you exported and saved onto your computer earlier
Type “http://localhost/phpmyadmin/” in the Internet browser’s address bar. (Log in with username root and your password if you set one, else, phpMyAdmin will just load.)
Remember, you must have XAMPP installed and Apache and MySQL modules running to access phpMyAdmin. Please visit our first post on installing XAMPP and running the modules if you need help with installing XAMPP and/or running the modules.
Make sure to name the database exactly the same as what is on the wp_config.php file. In our example, that would be “wordpress_dbname”.
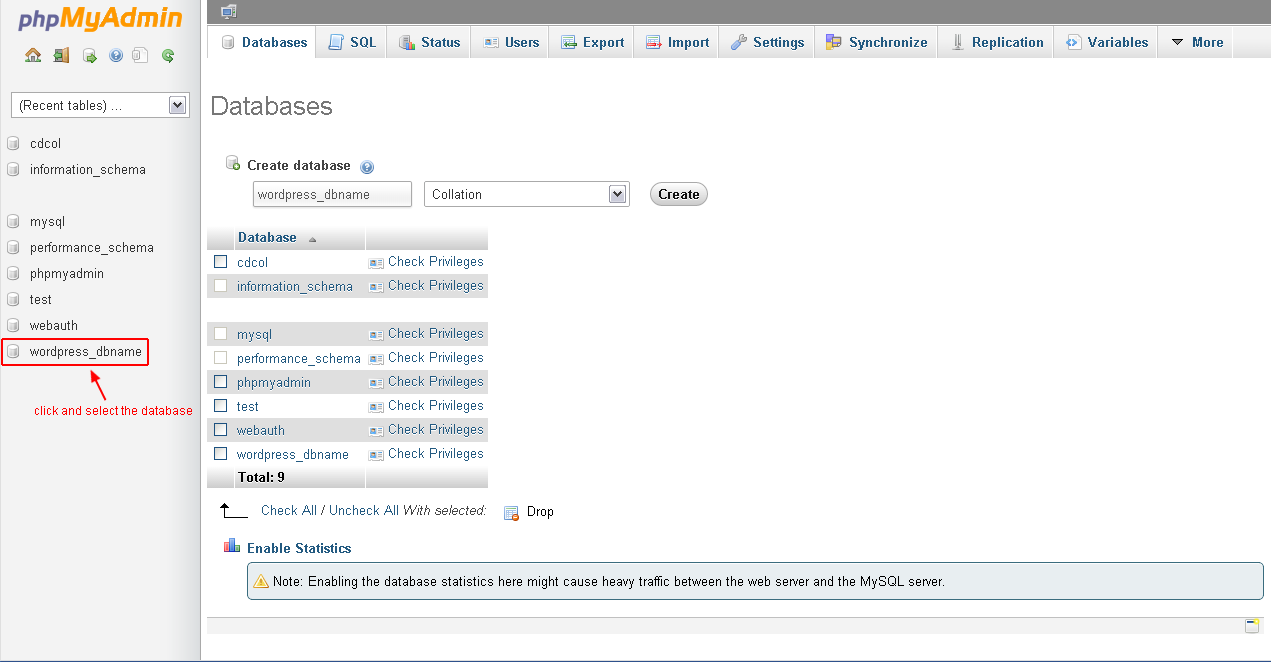
Once you hit the create button, your database will show up on at the sidebar on the left. Select your database.
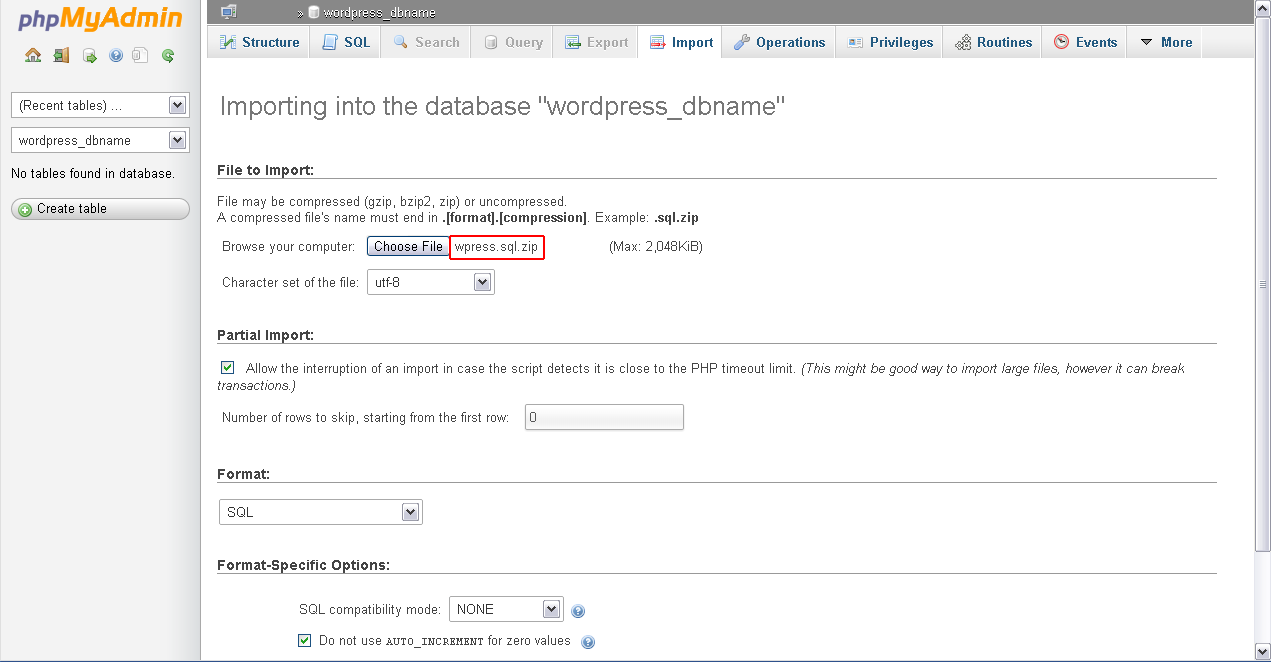
Once on the Import screen, click the “Choose File” button. Navigate to the directory you exported your blog’s database to and select it. In our example, it was exported and saved as wpress.sql.zip. Click the “Go” button at the bottom of the page to import.
The database should now be populated with data from your blog!
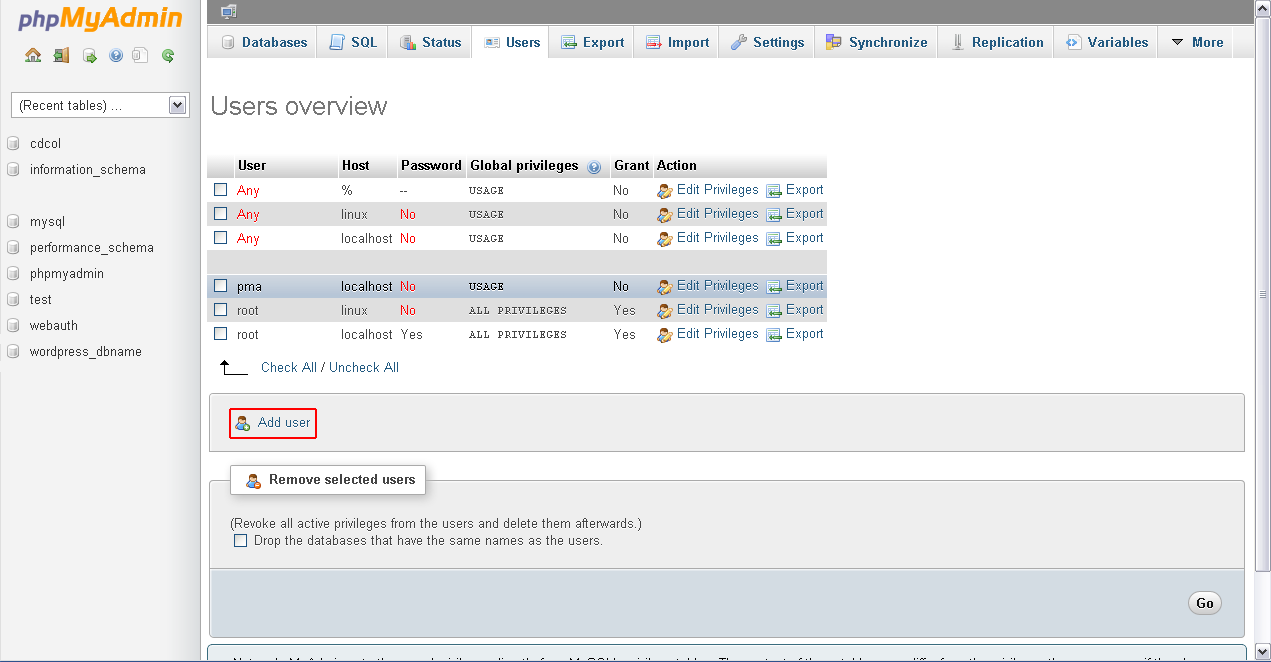
5. CREATE A USER FOR THE DATABASE
- Go back to the Home page of phpMyAdmin
- Click the “Users” tab
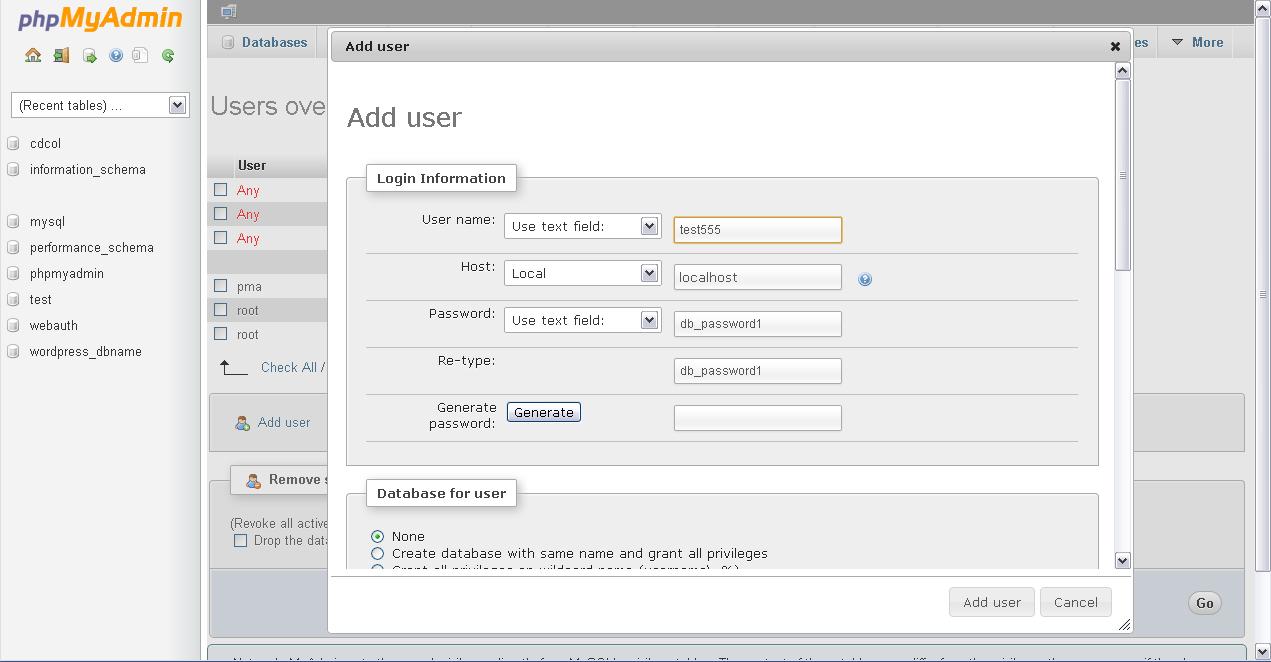
- Click “Add user” link on the Users screen to add a new user
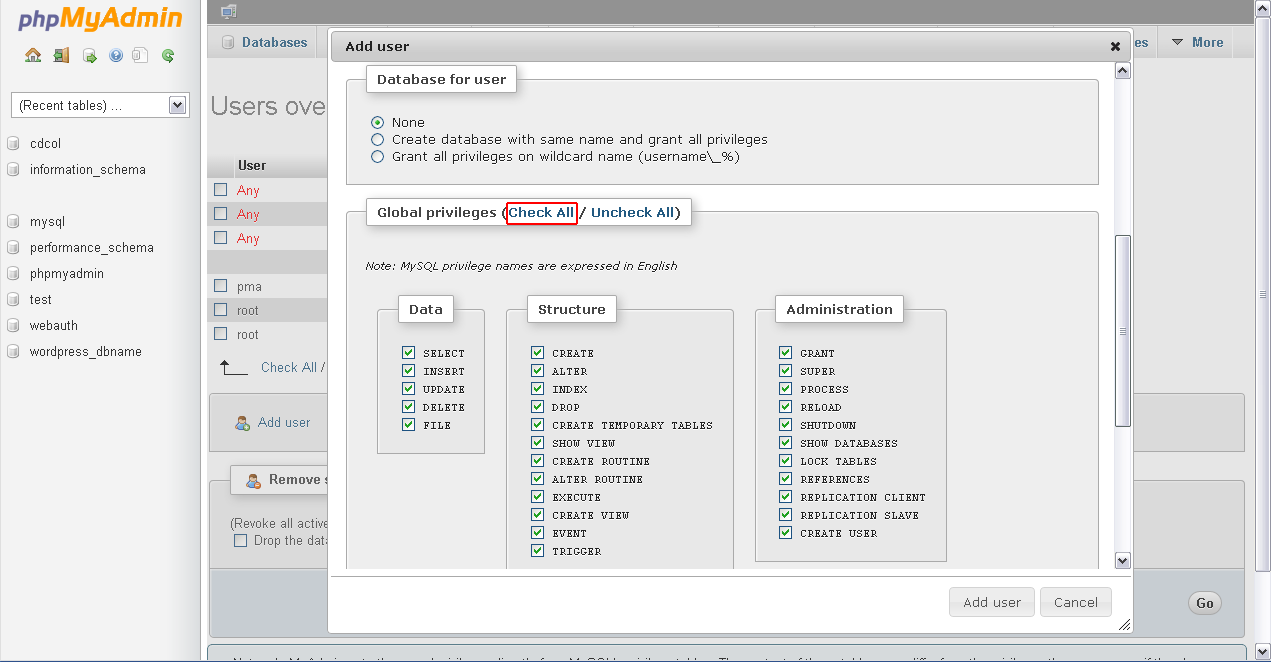
- Define global priviledges
- Click “Add user” button at the bottom of the page
To go back to the Home page, click the house icon at the top left corner of the sidebar.
A window will appear for you to fill in the username, host and password. Again, make sure this matches what is defined in the wp_config.php. In our example, this would be username: test555, host: localhost, password: db_password1.
Scroll down the window to the section called “Global privileges” and select “Check All” to grant all priviledges to the user
6. CONNECT THE CREATED USER TO THE DATABASE
After creating a user for the blog’s database, you will be transferred back to the “Users” overview screen. From here, you can connect this user to the database. To do this:
- Edit priviledges of the created user
- Select the database you created for the blog
- Click the “Go” button to connect the user
Having been transferred back to the “Users” screen after creating the user, find the user you just created (in our example, that’s “test555”). Along the row belonging to the user, you can edit this user’s priviledges by clicking the “Edit Privileges” link.
A window appears. Scroll down to the section called “Database-specific privileges”. In the drop-down menu, select your blog’s database (for us, it’s “wordpress_dbname”).
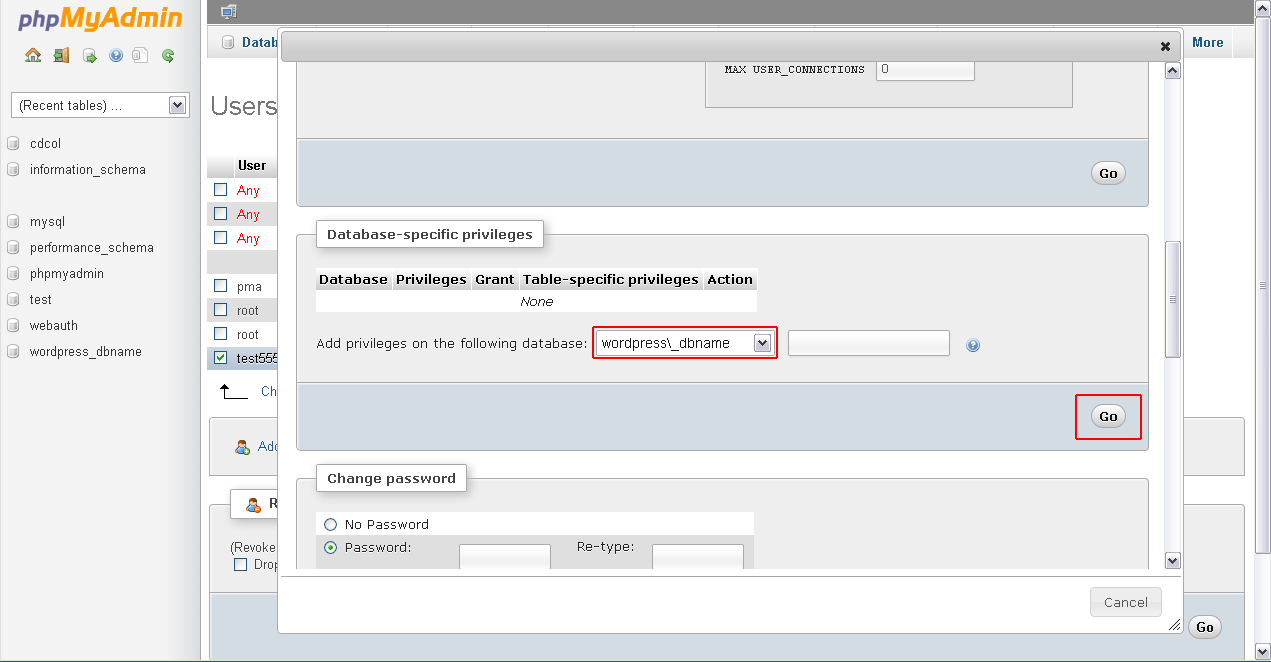
7. RE-DEFINE SITE ADDRESS OF YOUR BLOG
The database that was imported still contain a reference to your blog online. This reference needs to be changed to reference localhost. Not doing so will cause a lot of confusion: when you go log in to your blog’s Dashboard you will find none of your changes or additions have taken effect—what’s happened? You’ve been directed to the live version of your blog that’s online! So, it’s important to change the reference.
- In phpMyAdmin, select your blog’s database
- Click “wp_options” table on either the left sidebar or on the main screen
- Login to your blog’s dashboard and change references to localhost as well
- Open wpconfig.php and change references to localhost
All the tables will load on the left sidebar as well as on the main screen.
Rows of options will display on the main screen. The first row contains the reference to your blog online, for example:
option_id: 1 | option_name: siteurl | option_value: http://www.juliaandtania.com/blog
You want to change the option_value to “http://localhost/blog”.
In your blog’s Dashboard, you should also change the site URL to reference http://localhost/the_name_of_your_blog_folder/. Login to the blog on your computer through http://localhost/the_name_of_your_blog_folder/wp-login.php using the same username and password as you would for your blog online.
On the Dashboard’s side menu on the left, click “Settings” then “General”. General Settings page will load on the main screen. Change all instances referencing to your blog online to http://localhost/the_name_of_your_blog_folder.
15/02/2017 Update: Since writing this post, WordPress has added a couple of lines of code in wpconfig.php which is found at the root of your blog folder. wpconfig.php also has references to the site URL of your blog:
define(‘WP_HOME’, ‘http://www.juliaandtania.com/blog’); // no trailing slash
define(‘WP_SITEURL’, ‘http://www.juliaandtania.com/blog’); // no trailing slash
Make sure to change the above to reference http://localhost/the_name_of_your_blog_folder, otherwise you will find that clicking on the posts will lead you to the online version. Then when you try testing your local install of the blog offline, you’ll find that nothing is displayed properly. All the images are broken, clicking on posts will return a ‘not connected to the Internet’ error and the whole blog won’t look pretty since it’s referencing the CSS file that’s online and not your local version.
VIEWING YOUR BLOG ON YOUR COMPUTER
A copy of your blog should now load on your computer! Open your Internet browser then type http://localhost/the_name_of_your_blog_folder/ and it should all load.
That’s all there is to getting an existing blog onto your computer! You can now view the blog, test code, edit areas of your blog without needing to do so on your blog online. You can even do all of this offline: you do not have to be connected to the Internet to run this web server. Hope this has been helpful! Next and last post in this series will be securing the root user and the XAMPP directory.
Till next time!
ADVERTISEMENT