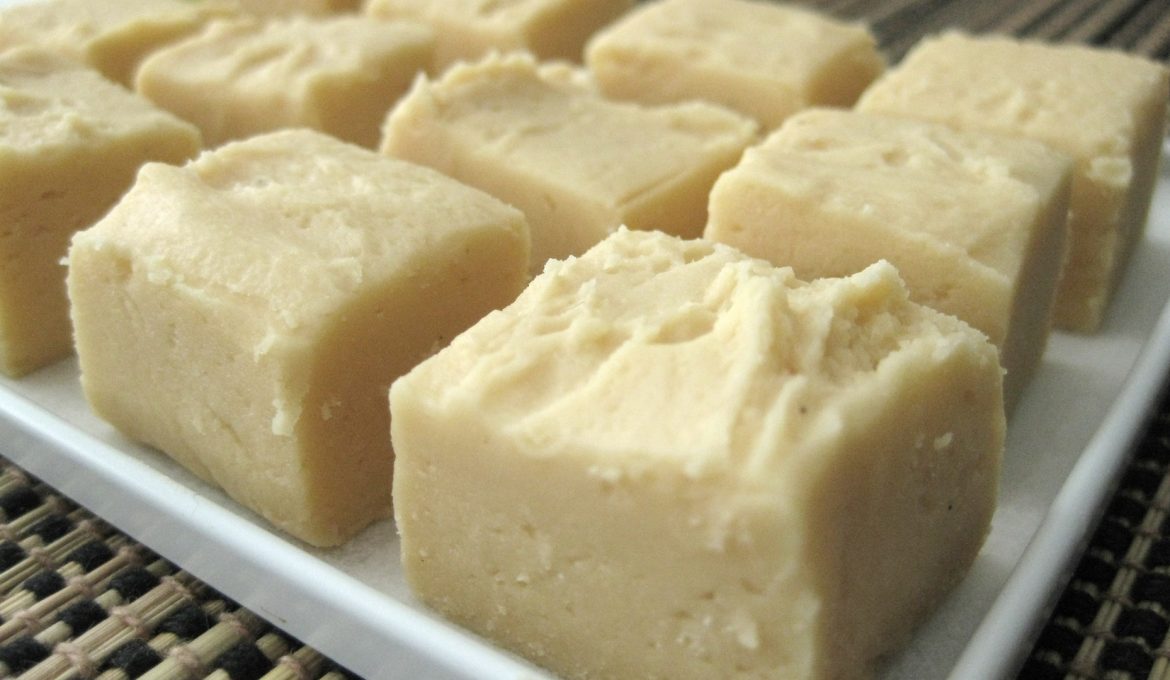
Fudge is a favourite confectionery of ours. It doesn’t matter what kind of fudge it is: tablet fudge, soft fudge, homemade, commercially-made, if it’s fudge we won’t discriminate. We do have a favourite kind though: soft, smooth and creamy.
Being people who enjoy giving a go at learning to make things we love to eat, we decided making fudge will be our next little project. Strangely enough, although we love eating fudge, neither of us have ever thought to try making it!
The ingredients for making fudge are not many, needing only a handful basic ingredients: some kind of dairy (milk, cream, evaporated milk, condensed milk), sugar, perhaps some kind of inverted sugar (golden syrup for example) as well, plus butter and flavouring for the basic fudge. Getting the ingredients definitely was not a problem. Making the fudge appears simple enough, too: it only involves putting all the ingredients together and bringing the syrup to the right temperature. Somehow though, we still ran into problems: the main ones being scorching, not setting properly and crumbling.
We tried to rectify the problems with heat adjustments; ingredient substitutions (like using condensed milk instead of milk or cream); omitting ingredients; and against what we should do, stirring the whole time.
After many batches and adjustments, we finally found a combination of ingredients that worked as well as a method that makes the kind of fudge we like to eat. See below!
Basic Vanilla Fudge Recipe
Note: The fudge is made the traditional way with added golden syrup in a 20 cm stainless steel pan on the stove-top. The recipe makes 16 cubes, roughly 2cm x 2cm x 2cm in size.
Ingredients
- 225g sugar
- 100g cream
- 100g milk
- 1/2 tsp golden syrup
- 14g butter
- Pinch of salt
- 1/2 tsp vanilla essence
Directions
- Line a small tin, roughly 10cm x 10 cm square tin with baking paper.
- In a medium-sized saucepan, pour in sugar, cream, milk and golden syrup.
- Heat on the lowest heat possible on your stove-top to give the sugar time to dissolve completely. You can stir occasionally to help the sugar dissolve quicker.
- When the sugar is completely dissolved, stop stirring. Increase heat to medium and cover with lid until the sugar slurry starts to bubble.
- Uncover. Insert your candy thermometer into the sugar slurry and reduce heat to low. Leave sugar slurry undisturbed and bring it to 116°C.
You may need to lower or increase the heat slightly. During this stage, what you want is for the sugar slurry to maintain a constant bubbling (not a boil). The constant bubbling moves the liquid around so that the sugar slurry doesn’t just sit at the bottom and end up scorching. Be careful not to turn the heat too high as the sugar slurry will also scorch. - When the mixture reaches 116°C, remove from the element. Add butter and let the mixture cool to 60°C. Do not stir or disturb whilst it cools down.
The temperature you cool the mixture till can be higher or lower depending on how smooth you like your fudge. A higher temperature will result in a fine sand-like texture whilst a lower temperature results in a smoother texture. We like 60°C, but have stirred the fudge at a temperature as low as 43°C for a smoother texture (we don’t recommend going lower as it becomes difficult to stir) and as high as 80°C for a sandier texture. - Once cooled to temperature, add vanilla essence and salt then stir with a wooden spoon until sugar slurry becomes fudge!
The sugar slurry is glossy at the beginning. As you stir, it should start to thicken and lose its gloss, changing many shades lighter. - Pour into lined tin. Smooth out the fudge and leave to set for around 2 – 3 hours.
- Once set, cut into 16 squares (or to the desired number and size.)
That’s pretty much it. After testing and eliminating what works and what doesn’t, making fudge is quite straightforward. Following this method, it takes very little effort to make. Unlike some recipes which call for stirring the whole way through the cooking process, this here doesn’t require it. Just make sure to keep the temperature on a low enough level for the mixture to bubble away and things should be all fine. We’ve added a video of this bubbling below. Remember to only stir at the beginning to help dissolve the sugar. Once the sugar dissolves, stop stirring and just let the sugar slurry bubble away and reach the 116°C temperature.
VIDEO: Bubbling Sugar Slurry
On the subject of stirring, we mentioned that we tried stirring throughout the whole cooking process in an attempt to rectify the issues we came across. We’re not sure what we’re doing differently to these recipes that recommend stirring constantly, but the fudge just crystallised and crumbled apart. It was such a sad, sad sight! :o( :o(. We’ll stick to standing and waiting around we think! We won’t try and work out how we can stir the whole time and not have the final fudge crumble. Standing around and waiting for the fudge to reach the temperature is less work anyway! :oP :oP.
Just to give an idea of how long it takes for the mixture to reach 116°C, for us, it takes around 45 – 70 minutes. It then takes another 30 – 45 minutes or so to cool. Then finally another 1 – 2 hours for it to set. It’s a lot of waiting time. It’s worth the wait, though. We promise. At the end of it you’ll have yummy, smooth, creamy fudge. Just a note: when you go and cut the fudge and you find that the fudge sticks to your knife or the fudge pieces stick together after cutting, it’s very likely that during the cooling stage, your fudge was rested at too humid conditions.
Fudge is quite sensitive to humidity, so we don’t recommend making fudge in a humid environment. You can have a perfect batch of sugar slurry cooked up to the perfect temperature, but under humid conditions, the fudge just won’t set properly.
Lastly, the texture of the fudge improves after a couple days’ resting/maturing. Make sure to store the fudge in an airtight container!
Hopefully, we’ve given some helpful information! Happy fudge making and eating!!
ADVERTISEMENT